Online Tools: USDA Soil Survey
 Understanding the types of soils that are located on your property can help you plan the best locations for your homestead and retreat improvements. Identifying areas of well drained soils for buildings, nutrient rich soils for plants, and dense soils for ponds are just a few examples of how understanding the soils on your property can help you save time and resources by developing a well thought out plan before you begin your next project.
The USDA has a free online tool packed with valuable soil survey information that can show you the general location of soil types on your property and the characteristics of those specific soils. To access this information go to the USDA Web Soil Survey site (http://websoilsurvey.nrcs.usda.gov/app/WebSoilSurvey.aspx). Once you are on the main page, follow these steps to obtain useful information about the soils on your property:
- You will begin at the “Area of Interest (AOI)” page. Using the navigation options on the left side of the screen, select the “Address” option under the “Quick Navigation” heading. Now in the address field enter your address using the format: street, city, state, zip code. You should now see an aerial image of the property address that was entered. If necessary, you can adjust the map image to center it over your property by selecting the “Pan” tool at the upper left corner of the map image and dragging the map around.
- Once the extents of your property can be seen in the map window, you will need to select an “Area of Interest (AOI)” on the map. This AOI will be the location for which soils data will be provided. To create an AOI, select the AOI tool above the map image that has a red rectangle depicted. Now begin at the upper left corner of the area you wish to select, then click and hold, dragging the red outline over your desired area, releasing the mouse button when you reach the lower right corner. The area will now be highlighted with a blue hatched box.
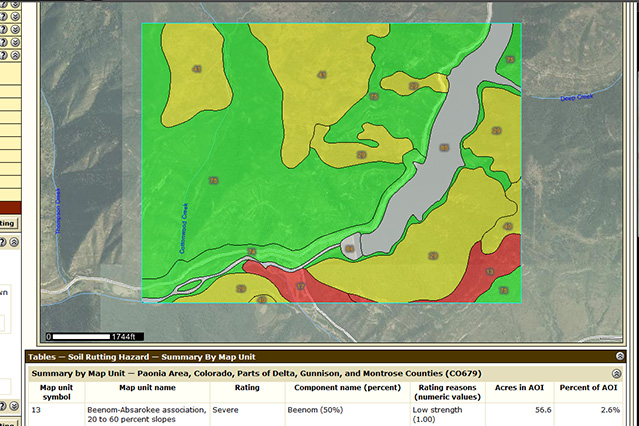
- Now select the “Soil Map” tab at the top of the page to see which soil types are mapped within your AOI. Each soil type is identified with a number on the map image. Use the “Map Image Legend” on the left of the screen for a listing of the soil types. Select the soil name in blue for a detailed description of the soil’s characteristics.
- Select the “Soil Data Explorer” tab at the top of the screen for detailed descriptions of uses for each soil type. Using the “Suitabilities and Limitations Ratings” legend on the left side of the screen, you can obtain useful information regarding land use and development considerations such as building site development, construction materials, land management and vegetative productivity.
While many additional resources are available on the USDA Soil Survey website, these are some of the most useful aspects for assessing the soils capabilities of your homestead and preparedness property. Taking the small amount of time that is required to assess your properties soil capabilities is well worth the investment.
Online Tools: USDA Plant Hardiness Map
 Many valuable resources are available for free online that can assist with planning your homestead or retreat property improvements. I will highlight the use of a few such online tools over my next few blog posts.
Selecting plants that can survive the winter temperatures of your particular location is an important and simple part of the planning process. Before investing your time and resources in a particular plant, verify the cold hardiness zone for your property using USDA maps.
USDA plant hardiness zone maps are available in a variety of geographic coverage areas, from full national maps (http://planthardiness.ars.usda.gov/PHZMWeb/Downloads.aspx), to regional maps, and state maps (http://planthardiness.ars.usda.gov/PHZMWeb/Maps.aspx). While these are helpful as general reference tools, it can be difficult to locate your specific property on such a large scale map. This is even more important if your property is located near the transition between two or more cold hardiness zones. It is also important to assess the mapped cold hardiness zones while considering the terrain features of your specific location, as the USDA mapping represents large general areas, which do not account for most terrain related microclimate areas (see my previous article for a detailed description of microclimates). In order to assess your cold hardiness zone with a greater level of accuracy, I suggest using the USDA online interactive map (http://planthardiness.ars.usda.gov/PHZMWeb/InteractiveMap.aspx).
Once you are on the USDA interactive map website, you will find that the tools it offers are rather straight forward and simple to navigate. Follow these steps to obtain useful information for your property from the interactive map:
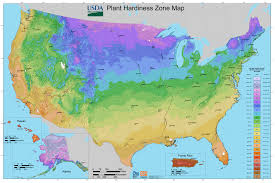
- You should see an image of the entire continental United States depicted as a colored map showing the USDA cold hardiness zones. Type your zip code into the box just below the “Interactive Map” title near the top left of the page, and then click the “Locate” button.
- The map image will change and should now be zoomed into the general location of your zip code. You can click and drag the map to center it on your approximate property location and use the zoom tool at the upper left corner of the map to zoom in closer to your property.
- Now that you can see the general location of your property, you can modify your view of the map to see more detailed information. Click on the “Zone Color Transparency” bar to change it’s value from 0 to 50. This will allow you to see through the cold hardiness zone color overlay to the basemap image below. You can change the base map image using the drop down menu options from the “Choose Basemap” menu. Depending on your familiarity with terrain and/or satellite imagery of your area, select the basemap that will allow you to best assess the cold hardiness zone information.
- Reference the color key to the right for determining which color correlates to the cold hardiness zone depicted on the map for your property. You might need to change the “Zone Color Transparency” back to a setting of 0 in order to accurately assess the color of the cold hardiness zone for your property.
If your property falls on or even near two or more cold hardiness zones, use the lower cold hardiness zone (the colder one). Now use this cold hardiness value to select plants for your property that are rated for your cold hardiness zone value or lower (meaning that they are even more cold hardy). I typically select plants that are rated at least one cold hardiness zone lower than the property is rated. This helps to act as a safety factor to prevent the loss of plants should a colder than usual winter occur. If you have a well protected microclimate on your property, you can take the risk of trying to grow plants that are one or two zones higher in those specific locations.
The primary value of assessing your USDA cold hardiness zone is that it empowers you with the ability to make informed decisions regarding the selection of plants that are more likely to be appropriately suited for the climate of your property. While it is important to also consider factors such as solar exposure and drought tolerance when selecting plants, assessing the cold hardiness is an important first step.